When we refer to the cloud, we’re talking about a storage system that keeps data stored and accessible on the internet. In recent years, the likes of Google Drive, Dropbox, iCloud, and other similar convenient data storage options have convinced users of the benefits of a cloud server.
The problem with these services is that they are all third-party. This often means that using them may incur a monthly service cost, potential inaccessibility should the servers or service crash, and security demands to keep data both safe and private.
What if I told you that you could build your own cloud server on Windows? That it wouldn’t be too large of an undertaking and that it would provide more advantages than your typical cloud service?
How To Set Up Private Cloud Storage Using a Windows 10 FTP Site
To build your own cloud server in Windows would normally require an upfront investment. To start, you’d need a storage system and a minimum of 100Mbps fixed broadband connection. This speed is recommended so that the cloud server can be easily accessed from anywhere.

The internet speeds will be limited to the local service providers in your area. As for the storage system, there are a couple of options from which to choose. One possibility is a NAS, which usually comes with its own web interface and online synchronization options.
For this article on how to build your own cloud server, we’ll be looking at repurposing a home Windows computer to allow cloud storage.
How To Build Your Own Cloud Server In Windows 10
You can build your own cloud server in Windows but it does require a few additions in order to pull it off. It’s also likely to be the cheaper option over something like a NAS as you probably already have a computer readily available.
One of the steps involved will require that FTP components be set up on your Windows 10 computer. This will make your Windows 10 PC internet accessible, meaning you can access it online from other devices, and give it the ability to manage files.
- Navigate to the Control Panel and click on Programs.
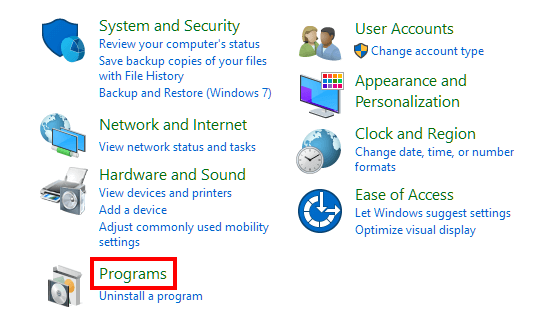
- Under Programs and Features, click Turn Windows features on or off.

- Expand the Internet Information Services (IIS) folder and place a check into the FTP Server checkbox. Next, expand Web Management Tools and make sure that IIS Management Console is also checked. Press OK.
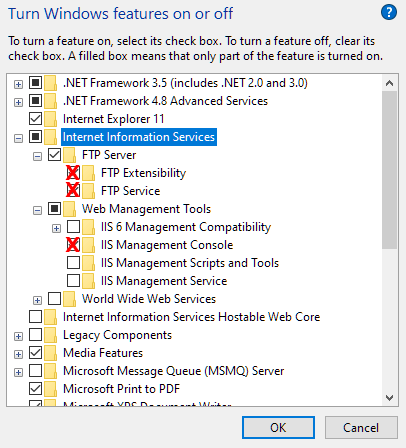
- Once these steps are completed, the components to set up an FTP server will be installed.
Configuring Your FTP Server Site
The next step is to set up an FTP server site that can be accessed over the web.
- Head back into the Control Panel and click on System and Security.
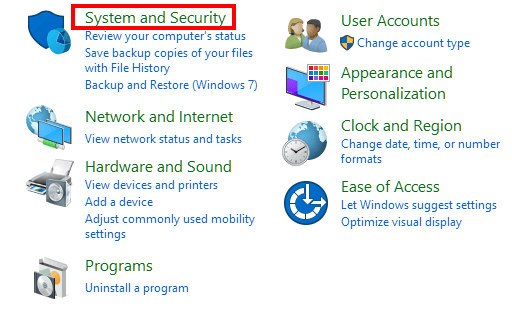
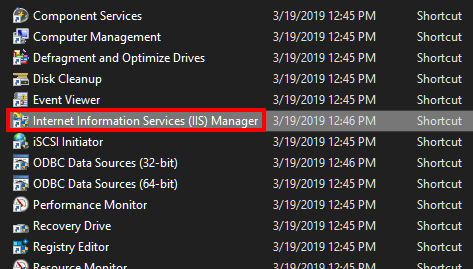
- Then, click on Administrative Tools.

- Double-click on Internet Information Services Manager.
- In the Connections pane, expand your computer name and right-click Sites. Select Add FTP Site…
- Add a name for your site and then locate the folder path where you’ll want to store all FTP files. We recommend creating a folder within the root of the main system drive (C:\) or an entirely different hard drive.
- Click Next. You should now be at the Binding and SSL Settings window. Set all settings to mirror the image below, and click Next.
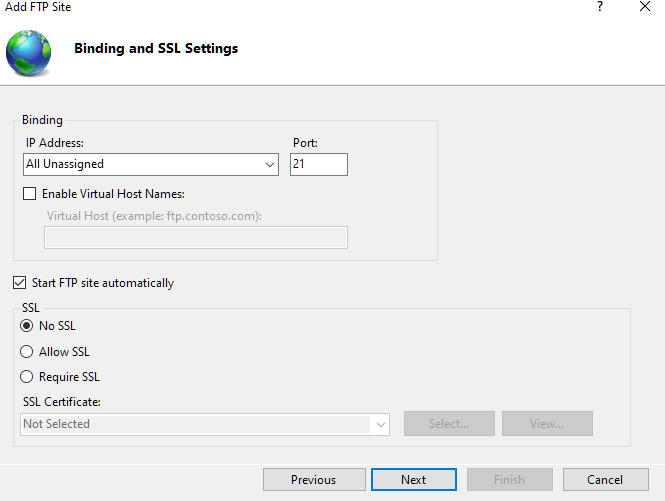
- Unless you’re planning to host sensitive data or are using this server for business purposes, an SSL is generally not required. For either of the purposes mentioned, it’s recommended that you acquire an SSL certificate.
- Again, mirror your settings to that of the image below. The email address should be the one attached to your Windows 10 account in order for you to gain access to it.
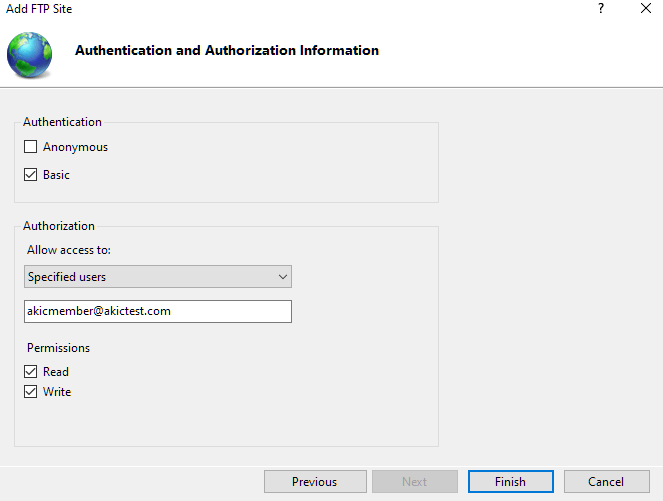
- Click Finish.
Setting Up The Firewall
Different firewall applications would have different setups for enabling connections to your FTP server. If you’re using the built-in firewall in Windows 10, FTP server connections are blocked by default until manually enabled.
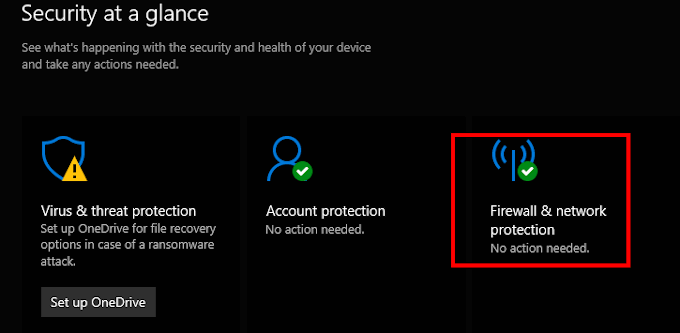
- To enable it, navigate to Windows Defender Security Center and click on Firewall & network protection.
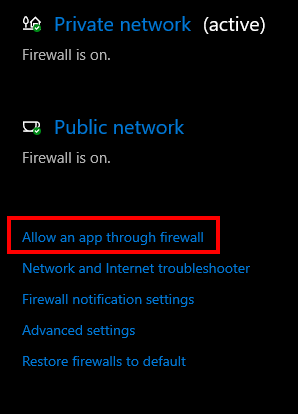
- Click the Allow an app through firewall link.
- Click Change Settings, locate FTP Server and place a checkmark in it as well as both Private and Public Access.
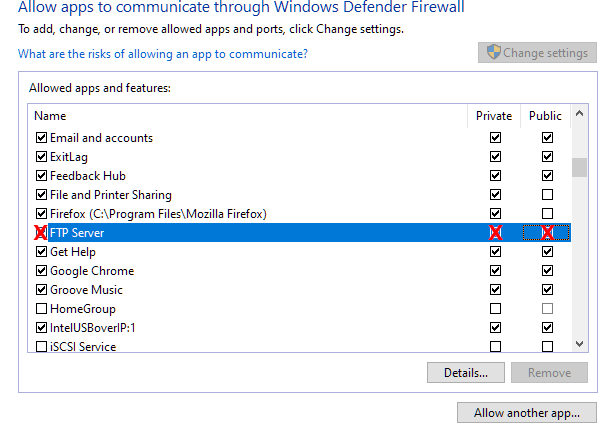
- Click OK.
At this point, your FTP server is now accessible from multiple devices on the same network.
Accessing Your FTP Server From The Internet
It’s time to open the Transmission Control Protocol/Internet Protocol (TCP/IP) port number 21 on your router. Each router is different when it comes to setting up port forwarding.

The steps provided here are a general guidance on how to do this safely. By following the link, you’ll be able to set up a static IP address and open a port to allow online traffic through.
Once set up, you’ll be able to access your FTP server files from anywhere.
Things To Remember
Using a personal computer as cloud storage does have some drawbacks to keep in mind. One issue that could occur is automatic updates taking place when you’re not at home. This would cause your PC to shut off, becoming inaccessible.
Though the files may be accessible across multiple devices, they aren’t automatically synchronized while offline. To pull that off will require a cloud service like OwnCloud or SeaFile.

Another problem would be shared resources between personal use data and cloud storage use. Depending what kind of data you’re storing, your hard drives could fill up fast.
When it comes to storage capacity, a PC is limited only to what you’re willing to pay for additional hard drives. Instead of worrying about increasing your monthly fee for a few extra gigabytes of accessible data, a one-time purchase of an additional hard drive is all you need.
Now that you have the tools and the knowledge, you can build your own cloud server in Windows and finally kick cloud storage service costs to the curb.
from Online Tech Tips https://ift.tt/2WKQJ3B
No comments: